Add Models
Once a chart is displayed in the ChaosHunter Trader, you can select a ChaosHunter model to actively trade with Interactive Brokers. Click on the Trading Setup button, and then select the Add Model button to browse to the location of a model that you previously trained in ChaosHunter. The model file should have a .md extension, such as SPY-5A.md. (Be sure each model has a unique name.)
You can select more than one model from a single directory by using the control key or the shift key with the mouse click to make your selections. If you add several models to a chart, they all must be either a reversal (where the model exits a long position and automatically enters a short position and/or the model exits a short position and automatically enters a long position) or all of the models must NOT BE reversals (which means there are times when the model is not in the market).
Majority Rule
You may select more than one model for each symbol and choose to send a trade to the IB Trader Workstation if two or more models produce the same signal on the same bar (a consensus). You must first add several models to the Panel of Experts list (see above for details).
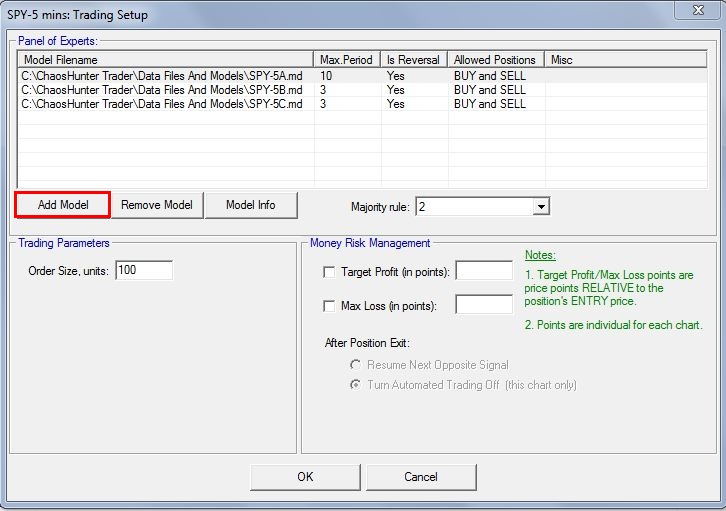
The Majority Rule drop down box will display the numbers from 1 to the total number of models that you have added to the Panel of Experts list. In the case of the three SPY models displayed in the screen above, if you select "2" in the Majority Rule box, then a trade is only sent to the IB Trader Workstation if any two of the three models produce the same trading signal on the same bar.
In general, it is recommended that you select a number for majority rule that is more than half of the total number of models that you have added to the Panel of Experts. In the case above trades would be sent to the IB Trader Workstation upon the completion of the bar when two models produce the same signal. In the case of five models, a trade would be sent when three of the five models produce the same signals upon completion of the same bar.
If you select a number that is less than half of the number of models listed in the panel of experts, a simple majority will decide how to trade. For example, there are 7 models and you have selected 2 from the majority rule drop down box. As the chart is running in real time, 3 models say buy, 2 models say sell, and the other 2 models do not produce a trading signal. Even though all three outcomes (buy, sell, and no trade) are greater than or equal to the Majority Rule threshold (which is 2), the BUY signal has a simple majority. Therefore, a BUY order will be sent to the IB Trader Workstation. If the number of buy and sell votes are equal, no trading signal is produced.
Trading Models Independently
If you have multiple models for a single symbol in the same chart and select a Majority Rule value of 1, the following sequence could occur. Model A produces a buy signal, which is sent to the IB Trader Workstation. On the next bar Model B produces a buy signal, but the trade is not sent to the IB Trader Workstation because your account is already in a position for that symbol and the ChaosHunter Trader does not allow you to increase a position. On the third bar, Model B produces a sell signal, which WILL BE sent to the IB Trader Workstation to exit the position generated by Model A. If you want to trade a single ChaosHunter model independently of any other models, it is a better practice to create a chart with only one model.
If you want to trade different charts for the same symbol, the positions for the same symbol will be combined in the Interactive Brokers Trader Workstation, possibly causing confusion. For example, if one chart is long one contract, and another chart is short one contract, your net position will be neutral in the Interactive Brokers Trader Workstation, but the two charts in ChaosHunter Trader will display both a long and a short position. THEREFORE IT IS NOT RECOMMENDED THAT YOU CREATE SEVERAL CHARTS FOR THE SAME SYMBOL AND TRADE THEM AT THE SAME TIME.
Remove Model - If you no longer wish to trade a model, select that model in the Panel of Experts, and click on the Remove Model button. If no model is selected, the last model on the list will be eliminated.
Model Info - If you want to view details on a particular model listed under the Panel of Experts, select that model with the mouse and then click on the Model Info button. The Model Info box will display details such as the model's name and location on your computer, the number of inputs, a list of inputs, the model output, whether or not the model is a reversal, whether both Buy and Sell positions are allowed, the ChaosHunter formula as well as the buy and sell thresholds.
Note: You have the option of adding other models to the Panel of Experts even if you are in the process of automatically trading a chart.
In the Order Size units box enter the number of units you wish to trade. For example, if you want to trade 100 shares of a stock, enter 100 in the box. If you want to trade two futures contracts, enter 2. If you want trade Forex, enter the amount of the base currency you want to trade. The Order Size that you enter will also be used for Manual Trading.
The ChaosHunter Trader includes settings that allow you to take profits and/or limit losses when the system is trading automatically.
Target Profit (in points) - Enter the number of points you would like the chart to earn as profit before automatically exiting the trade.
Max Loss (in points) - Enter the number of points you would allow the chart to lose before automatically exiting the trade.
The Target Profit and Max Loss point values you set are either added (profit) or subtracted (loss) from the ENTRY price if you are in a BUY position. For a SELL position, the logic is reversed. You can set either a Target Profit or Max Loss or both for the same chart. The point value you set should also account for slippage. You are NOT required to enter any Money Risk Management point values in order to trade the chart. It is very strongly recommended that you monitor all trading activity, no matter what the settings.
Examples
The Target Profit and Max Loss points that you set are not to be confused with the number of pips or ticks. One point is the movement of price from one to two, or 598 to 599, or 0.0025 to 1.0025. You will probably want to set your number of points in reference to the number of dollars or other currency that you are willing to win or lose. In this sense the number of points you set will be affected by the number of shares, contracts, or units of currency you are trading.
Stocks - In the U.S. stock market a 1 point change is a change of $1 in price. If Verizon goes from 38.58 to 39.58 a share, that is a 1 point move. So if you are trading 100 shares, each point is a loss or gain of $100 per trade. (100 shares times $1.00 point value). If you are only willing to lose a max of $50 per trade, set the Max Loss points to 0.5. If you are trading 1000 shares, a Max loss of .5 points says you are willing to lose $500.
Futures - A single futures contract for Crude Oil has a point value of $1,000. If you simply want to make a profit of $200 per trade, set the Target Profit to 0.2 points. For the S&P 500 E-Mini, the point value is $50, so if you want to make a profit of $100 per trade, set Target Profit points to 2, presuming you are trading 1 contract. If you are trading 2 contracts and want a $100 profit, set the Target Profit points to 1.
Cash (Forex) - Forex can be traded these days in units smaller than a standard contract, so you have to be more careful calculating points when trading Forex. Do not confuse points with PIPs. The following examples assume that the quote currency is U.S. dollars.
For example, the Australian dollar trades in increments of .0001 or 1/10,000 of a point. Therefore the Australian dollar has a point value of $100,000 per contract since every point move is a gain or loss of $100,000.
If you are trading a 100,000 unit contract of the Australian dollar, and you want make a profit of $100 on each trade, set the target points to 100/100,000 = 0.001
If you are trading only a 10,000 unit contract, a $100 profit would be obtained using ten times the number of points, or a target of 100/10,000 = 0.01
If you want to trade a 62,500 unit contract for the British Pound, and you want to make $100 per trade, set the Target Profit points to 100/62,500 = 0.0016
However, for a 10,000 unit contract for the British Pound you will need 100/10,000 = 0.01 points
In general divide expected profit or maximum loss by the number of units you are trading in order to set the points.
Details about the Interactive Brokers symbols are available by entering the symbol in the Trader Workstation and then right mouse clicking on the symbol to find Contract Info, and then Details. For futures, look for the multiplier (point value).
ChaosHunter Trader does not use stop and limit protective orders to effect money risk management. The point values you add for either a Target Profit or Max Loss are evaluated every 5 seconds. The program compares these values to the entry price and produces an immediate exit signal, even if the bar in the chart has not closed. The exit signals are market orders and therefore are not as effective as stops and limits executed by the Interactive Brokers Trader Workstation.
Note: You may add Money Risk Management point values even when the chart is actively trading.
Trading After Exit
If the chart is using Money Risk Management, you MUST select one of the following options for future trading activity:
Resume Next Opposite Signal - Allows the chart to enter a trade when the opposite of the signal that entered the trade that was exited by either a Target Profit or Max Loss point value. For example, if the chart was in a long position and the Max Loss point value triggered an exit, the chart will only enter another trade when a short signal is generated by a model(s) in the chart.
Turn Automated Trading Off (this chart only) - stops sending trades to the IB Trader Workstation as soon as either a Target Profit or Max Loss exit is triggered. Automatic trading for other charts is not affected.
Trade the Model
Once you've completed setting up a chart for trading, you can send trades to InterActive Brokers or monitor trading signals in real time.
Related Topics: